Table of Contents
Understanding the basics is crucial. From exploring various customization options to reaping the benefits of personalization, we’re here to help beginners dive into this exciting world. Customizing your keyboard allows us to tailor its features and profile to our liking, creating a unique typing experience every time we use it.
Whether it’s experimenting with different spring weights or adding foam for a more tactile feel, customizing our keyboards can be a fun and rewarding part of our tech journey. Join us as we delve into the hot topic of mechanical keyboard customization, uncovering how user-friendly modifications like Tiger Lite switches can enhance our overall typing experience. Let’s explore together how personalizing our keyboards can lead to a great time while using them.

Understanding Mechanical Keyboard Basics
When customizing a mechanical keyboard, understanding its parts is crucial. The different components, such as keycaps, switches, and cases, all contribute to the overall functionality of the keyboard. For instance, choosing specific keycaps can significantly impact the aesthetics and feel of typing.
Exploring customization potential in various keyboard parts allows us to personalize our keyboards based on our preferences. For example, we can opt for unique artisan keycaps or experiment with different switch types to enhance our typing experience.
Planning Your Custom Keyboard
Choosing Case Material
When customizing a mechanical keyboard, choosing the case material is crucial. We have options like aluminum, plastic, and wood to consider. Each material has its own advantages and drawbacks. For example, aluminum offers durability and a premium feel but adds weight to the keyboard. On the other hand, wood provides a unique aesthetic appeal but may lack in terms of durability compared to metal options.
The case material not only affects the overall look of our keyboard but also influences its weight and sturdiness. If we prioritize aesthetics and are willing to sacrifice some portability for a sleek appearance, we might opt for an aluminum case. Conversely, if we value lightweight designs or seek a more natural look, wood could be our preferred choice.
Building Your Custom Keyboard
When customizing a mechanical keyboard, we need to follow a step-by-step process for a successful outcome. First, we should start by disassembling the keyboard to access its components. This involves removing the keycaps and switches using a keycap puller and switch opener.
Once the keyboard is disassembled, we can begin modifying it according to our preferences. For instance, if we want to change the switches for a different typing experience, this is the stage where it’s done. It’s crucial to ensure that each modification is carefully executed to avoid damaging any part of the keyboard.
After making all desired modifications, it’s time to reassemble the keyboard. This includes placing back the modified or new switches and securing them in place with soldering if necessary. Finally, putting back all the keycaps will complete your customized mechanical keyboard.
Customization might also involve programming macros or changing LED settings on certain keyboards. Once everything is put together again, testing your customized mechanical keyboard thoroughly is essential before regular use.
Customizing Keyboard Components
Switch Installation
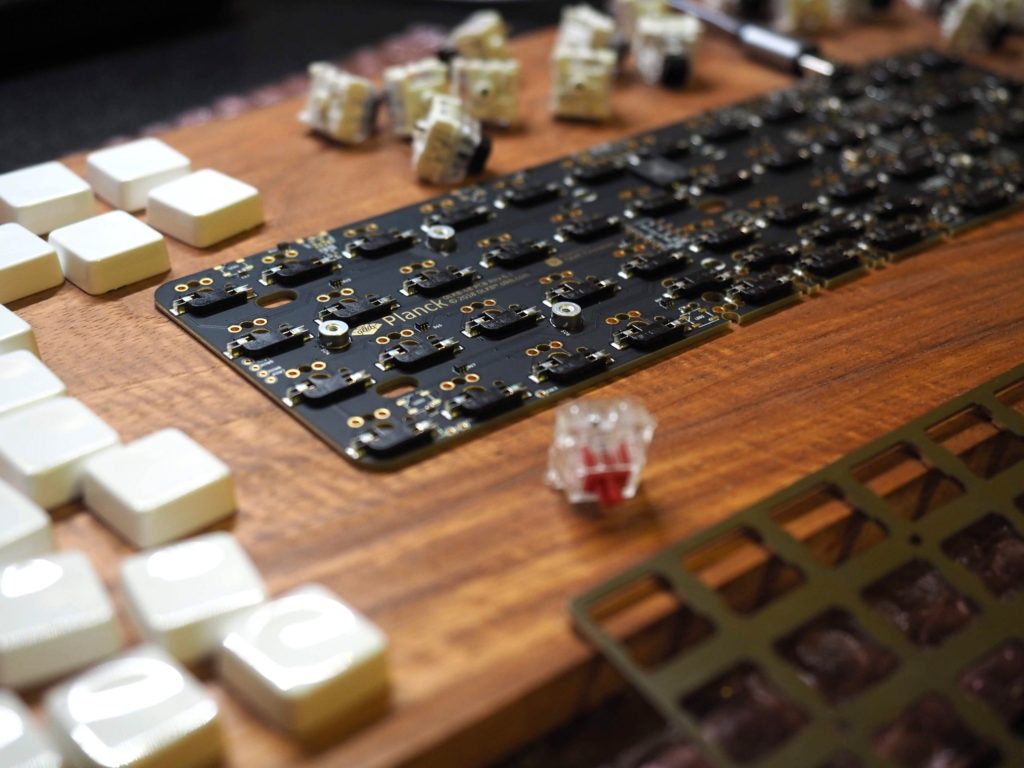
When customizing a mechanical keyboard, switch installation is a crucial step. We can explore different methods, like using hot-swappable sockets or soldering. Hot-swappable sockets allow us to change switches without desoldering, while soldering provides a more permanent option. Proper alignment and stability are essential during switch installation to ensure smooth keypresses.
For hot-swappable sockets, we simply need to insert the switches into the designated slots on the PCB (printed circuit board). On the other hand, when soldering switches, we have to carefully melt solder onto each switch’s contact points on the PCB for secure attachment.
Tips for ensuring proper alignment and stability include double-checking the orientation of each switch before securing it in place. This prevents any accidental damage caused by incorrect alignment. Applying gentle pressure while inserting the switches helps maintain stability within the keyboard assembly.
Stabilizer Significance
Understanding stabilizers is vital as they play a significant role in enhancing typing consistency and feel. Different types of stabilizers such as plate-mounted and PCB-mounted offer distinct advantages based on individual preferences.
Plate-mounted stabilizers attach directly to the metal plate inside our keyboard’s housing. They are relatively easier to install but may produce slightly louder sounds compared to their counterparts due to direct contact with the plate.
On the other hand, PCB-mounted stabilizers affix directly onto holes in our keyboard’s printed circuit board (PCB). While they require more intricate installation procedures than plate-mounted ones, they offer quieter keypresses due to reduced friction against metal plates.
Lubricating and tuning stabilizers is essential for achieving optimal performance from them. Applying an adequate amount of lubricant reduces friction between moving parts within stabilizers which results in smoother key movements during typing sessions.
Keycap Artistry
Exploring keycap customization allows us to personalize our keyboards’ appearance according to our unique preferences. The world of artisan keycaps offers endless possibilities for creating visually striking designs that reflect individual styles and interests.
Different materials like ABS (acrylonitrile butadiene styrene) and PBT (polybutylene terephthalate) cater to varying textures and durability levels suitable for diverse usage scenarios – whether it’s intense gaming or prolonged typing sessions at work or school.
Aesthetic and Functional Customizations
Case Options
When customizing our mechanical keyboard, we have the opportunity to explore a wide range of designs and styles for the case. It’s essential to consider factors like form factor, aesthetics, and compatibility when choosing a case. For instance, if we prefer a compact setup, we might opt for a 60% form factor case. On the other hand, if we want dedicated arrow keys or function keys, then a larger form factor might be suitable.
By selecting the perfect case design, we can truly personalize our keyboard’s look. Some popular options include high-profile cases that cover the switches entirely and low-profile cases that offer a sleeker appearance with more visibility of the switches.
Material Choices for Plates
Understanding how different plate materials affect typing feel and sound is crucial in achieving our desired customization goals. When exploring plate options such as aluminum, brass, and polycarbonate plates, it’s important to consider how each material impacts the typing experience.
For example:
- Aluminum plates are known for providing a firm typing feel with minimal flex.
- Brass plates offer more rigidity compared to aluminum but introduce a slightly softer bottom-out feel.
- Polycarbonate plates provide flexibility and can create a softer typing experience compared to metal plates.

Choosing an appropriate plate material aligns with our preferences for keypress feedback – whether it’s crispness or softness – offering us greater control over our overall typing experience.
Sound Tuning Techniques
To further customize our mechanical keyboard’s color, adjusting its sound profile is another exciting aspect of personalization. Foam dampening is one technique that involves placing foam inside the keyboard case to reduce reverberations caused by keypresses. This results in quieter operation without compromising on tactile feedback.
Lubing switches is another method where lubricant is applied to switch contact points to reduce friction-induced noise while enhancing smoothness during keystrokes. Additionally, using different keycap profiles can also impact sound – spherical keycaps may produce deeper sounds than cylindrical ones due to their shape differences.
The Customization Process
Selecting Ideal Components
When customizing a mechanical keyboard, selecting ideal components is crucial. We need to consider factors such as budget, typing experience, and aesthetics. For instance, if we prefer a quieter typing experience, we might opt for silenced switches or dampened keycaps. It’s essential to find the perfect combination of components that align with our preferences.
Compatibility issues can arise during customization. Understanding factors like keycap compatibility, switch compatibility, and layout compatibility is crucial for a smooth assembly process. Ensuring all components work harmoniously together is vital in creating a fully functional custom mechanical keyboard.
Assembly Tips and Tricks
Assembling a custom mechanical keyboard requires attention to detail and precision. Proper alignment, stability, and soldering techniques are essential during the assembly process. For example, ensuring that the stabilizers are properly lubricated can significantly improve key stability and reduce rattle.
Troubleshooting common assembly issues is an integral part of the customization process. Whether it’s addressing inconsistent switch actuation or stabilizer rattle, having troubleshooting skills at hand can save time and frustration during the assembly process.
Testing and Fine-Tuning
Performance Testing
When testing the performance of our custom mechanical keyboard, we focus on factors like typing speed, accuracy, and comfort. We measure our typing speed before and after customization to gauge any improvements. We assess the accuracy of keystrokes to ensure that the modifications haven’t affected our precision negatively. Comfort is crucial; therefore, we pay attention to how the keyboard feels during prolonged use.
After evaluating these aspects, we gather feedback from each member of our group regarding their experience with the customized keyboard. This allows us to identify specific areas that need improvement or adjustment based on individual preferences. For instance, if someone experiences discomfort in a certain area while typing for an extended period, it indicates a need for further fine-tuning in that particular region.
Pros:
- Objective assessment of performance changes.
- Customization based on individual comfort and preference feedback.
Cons:
- The subjective nature of comfort evaluation may vary among users.
Tuning for Feel and Sound
Fine-tuning the typing feel and sound involves various techniques such as switch lubing, stabilizer tuning, and foam placement within the keyboard. By applying lubricant to switches, we aim to reduce friction between moving parts which enhances smoothness during keystrokes. Stabilizer tuning ensures consistent keypresses by adjusting components responsible for key stability.
Moreover, placing foam inside the keyboard helps dampen noise levels produced by keystrokes; this is particularly beneficial when working in shared spaces where noise reduction is essential. These adjustments contribute significantly towards achieving a satisfyingly customized typing experience tailored precisely according to our preferences.
Our goal is not only to enhance functionality but also to create an auditory environment that aligns with personal preferences—whether it’s a quieter workspace or one filled with subtle yet pleasing sounds emanating from each keypress.
Key Information:
- Switch lubing reduces friction between moving parts.
- Stabilizer tuning ensures consistent keypresses.
Advantages of Customization
Personalization Benefits
Customizing your mechanical keyboard offers a range of benefits that can enhance our overall typing experience. By making personalized adjustments, we can significantly improve comfort, productivity, and enjoyment. For instance, we can modify the key switches to match our preferred actuation force and tactile feedback, which ultimately enhances comfort during extended typing sessions.
Moreover, customization allows us to reflect our unique style and personality through our keyboard. We have the freedom to choose different keycap designs or colors that resonate with our individual preferences. This personal touch not only makes the keyboard visually appealing but also creates a sense of ownership and pride in using a device that truly represents who we are.
Furthermore, customizing the layout or positioning of keys based on our usage habits can lead to improved productivity. For example, mapping specific functions or shortcuts to certain keys streamlines workflow efficiency by reducing the need for complex combinations or mouse navigation. This tailored approach optimizes how we interact with the keyboard and ultimately boosts our overall satisfaction while using it.
Performance Enhancement
Customization plays a crucial role in optimizing various aspects of keyboard functionality. Through personalized adjustments such as modifying actuation points or installing dampening materials under keycaps, we can fine-tune typing speed and accuracy according to our specific preferences.
Customizing aspects like stabilizers and switch types enables us to unlock the full potential of mechanical keyboards in terms of both gaming and professional use cases. By tailoring these components based on individual needs—such as adjusting actuation distances for gaming—we ensure an enhanced user experience that aligns perfectly with how we interact with the device.
Furthermore, ergonomic modifications like adding wrist rests or adjusting tilt angles contribute significantly to enhancing comfort during prolonged use. These customized enhancements minimize strain on wrists and fingers while promoting healthier typing postures—an essential aspect often overlooked when using standard keyboards without customizable features.
Resources for Keyboard Builders
Parts Sourcing
When customizing a mechanical keyboard, we need to ensure that we have access to the best components. One way to do this is by sourcing high-quality parts. We can explore reliable vendors who specialize in mechanical keyboard components. Group buys are another option where we can join a collective purchase with other enthusiasts to get the best deals on premium parts. Online communities dedicated to mechanical keyboards often have buy/sell/trade sections where members offer unique and high-quality components.
To illustrate, when looking for switches or keycaps, reputable vendors like NovelKeys and Drop provide a wide selection of options suitable for different customization preferences. Furthermore, participating in group buys organized by platforms such as Geekhack allows us to procure rare or specialized components at competitive prices.
Another essential aspect of sourcing parts is being part of online communities like Reddit’s r/MechanicalKeyboards or Discord servers focused on custom keyboard building. These forums serve as valuable resources where we can seek advice from experienced builders, share our own experiences, and learn about new products and techniques from others’ projects. Moreover, these spaces often host tutorials and guides created by community members that are invaluable in enhancing our customization journey.
Some common sources for keyboard parts sourcing
- https://novelkeys.com/collections/keycaps
- https://kbdfans.com/collections/pcb
- https://kineticlabs.com/keyboards
Community Forums and Guides
Community forums play an integral role in the world of mechanical keyboard customization. They allow us to connect with fellow enthusiasts who share similar interests and passions for keyboards. By leveraging these platforms, we gain access to a wealth of knowledge accumulated by seasoned builders over time.
For instance, joining enthusiast groups on platforms like Reddit or Discord enables us to engage in discussions about various aspects of custom keyboard building – from switch preferences to case materials – helping us make informed decisions during our projects based on the shared experiences within the community.
Moreover, many seasoned builders contribute comprehensive guides covering every aspect of customizing a mechanical keyboard – from soldering techniques and firmware flashing instructions to lubing switches effectively – providing beginners with step-by-step guidance through their customization journey.
Conclusion
In customizing your mechanical keyboard, we’ve explored the fundamentals, of planning, building, and fine-tuning processes. We’ve delved into customizing components for both aesthetics and functionality, understanding the advantages of customization, and discovering valuable resources for keyboard builders. Now equipped with this knowledge, it’s time to embark on your own keyboard customization journey. Whether it’s enhancing typing experience or expressing personal style, our collective experiences and insights can guide us in creating unique, tailored keyboards that truly reflect our individuality.
As we conclude this comprehensive guide, let’s take the next step together. Share your customized mechanical keyboards with us and join the vibrant community of keyboard enthusiasts. Let’s continue to learn from each other, exchange ideas, and inspire innovations in the world of keyboard customization.
Frequently Asked Questions
How do mechanical keyboards differ from regular keyboards?
Mechanical keyboards use individual mechanical switches for each key, providing a tactile and audible typing experience. They are known for durability and customizable features, unlike regular membrane keyboards.
What are the essential components needed to build a custom mechanical keyboard?
The essential components include a PCB (printed circuit board), case, switches, stabilizers, keycaps, and a USB cable. Each component plays a crucial role in the functionality and aesthetics of the custom keyboard.
Can I customize the appearance of my mechanical keyboard?
Yes, you can customize the appearance by choosing different keycap designs, materials, colors, and profiles. Custom cases and backlighting options allow for further personalization based on your preferences.
Are there any specific tools required for building or customizing a mechanical keyboard?
Tools such as switch pullers, soldering irons (for some customization tasks), lubricants (for smooth switch operation), keycap pullers, and screwdrivers are commonly used when building or customizing mechanical keyboards.
How can I test and fine-tune my customized mechanical keyboard?
After assembling your customized keyboard, testing involves checking each key’s functionality using software programs designed for this purpose. Fine-tuning may involve adjusting switch actuation points or modifying lighting effects through firmware configurations.